Showing posts with label Workbench. Show all posts

Sunday, September 18, 2022

Modeling Miscellaneous Section

On the right hand side of the blog I have created a section called Reference Pages. Each aspect of model railroading has a 'section' that consolidates general and WWSL specific model railroading information.

This month I have focused on formatting and consolidating Modeling Miscellanious information. The index page is 11.0 Modeling Miscellaneous

The following topics have been identified and sorted. Information will be updated as I get it all together.

General

11.1 Workshop
 
11.2 Tools
11.2.1 Benchwork Tools
11.2.2 Track Tools
11.2.3 Scenery Tools
11.2.4 Electrical Tools
11.2.5 Locomotive and Rolling Stock Tools
11.2.6 Structural Tools

11.3 Scale Measurements
 
11.4 Supplies
11.4.1 Wood
11.4.2 Styrene

1.5 Adhesives

11.6 Tips and Techniques

11.6.1 Wood
11.6.2 Styrene
11.6.3 Soldering
11.6.4 Etching
11.6.5 Resin Casting
 
11.7 Paint
11.7.1 Scenery Paint
11.7.2 Acrylic Paint (V)
11.7.3 Brush Painting
11.7.4 Paint Booth
11.7.5 Air Brush Painting
11.7.6 Weathering Station

11.8 Decals
11.8.1 Dry Transfers
11.8.2 Wet Decals
 
11.9 Chalks and Powders

11.10
11.11
11.12
11.13
11.14
11.15


Sunday, October 10, 2021

Break In Track

In my earlier model railroading days, I didn't go into high end locomotives. Athearn Blue Box was my choice - frankly that brand WAS the leading edge of technology and quality. With David Burrows minimalist philosophy in mind,  out of the box and onto the track was acceptable in my mind. Direct Current and analog control systems didnt require any tune ups or configuration upgrades, etc.

With DCC the whole philosophy changes. DCC requires programming tracks, can motors and drive trains require break in, decoders need speed control tweaking, and double heading requires speed matching. It really doesn't work on a railroad modeling layout. Something else is needed to do all that programming, tweaking and speed matching.

Given and druthers

For the current test objectives, the givens and druthers for this test layout are as follows:

  1. The test track needs to be conveniently located near my workshop. The main motivation for building it is to have a place to quantify my tune up impact of the various HO locos that I work on.
  2.  It needs to be in a spot that will be undisturbed for long periods of time.
  3. The grade needs to be zero in the level portion. It needs to adjust to a maximum 2.5%. Grade change based on raising the table legs.
  4. The length of the active test sections needs to be long enough to ensure that the acceleration of the test unit has stabilized to zero. It needs to be capable of allowing an hour break-in run (50% forward and 50% reverse).
  5. The track sections shall be wired using DCC best practices. The initial tests will all be DC, later testing will also include DCC testing.
  6. The track roadway shall be cork strip and the track shall be adhered to the cork with acrylic caulk.

I had to smile when, after noting how various modelers were handling the break-in challenge, it came to mind that a circle, the basic layout of a Christmas present decades ago. An older mind contemplated putting it under the benchworked but not built helix, but not being able to see the locomotive in motion was the drawback.

I walked past the solution every day for a couple of years before I realized the solution.

If you've read my earlier planning pages you know that I have a pretty decent basement for railroad modeling. The stairs are at one end of the basement, the utilities are centralized in two 'better than ok' locations allowing for lots of uninterrupted railroad. My crew lounge / workbench area substitutes for a utility room when I'm not modeling. 

I have a rolling dispatcher's desk that abuts against the furnace area when operations are ongoing .....

The dispatching area! To hide the furnace during operations, I built a folding wall from four 2 foot by 6 foot plywood panels secured by hinges with removable pins. The dispatchers desk is placed along the furnace wall. What if that break in track was a circle on a 4' x 4' plywood panel and hinged to the hinged panels? Move the desk and raise the panel for break in operations and leave it hinged downward and out of sight the rest of the time.

Construction. Construction was very simple.

  1. A 4 foot x 4 foot by 3/4 inch plywood, painted all 6 sides WWSL subsoil color to allow easier observation of wheel sets in operation .
  2. An 1" x 2" frame to prevent warpage and protect track from being bumped, or torn loose when in storage (or rolling stock from falling on the floor).
  3. Two 3-inch hinges to attach the module to the dispatcher wall panel.
  4. A 21-inch radius circle, (minimum WWSL curvature) using Atlas Code 83 flex track on a Midwest cork roadbed to minimize track noise during motor and drive train evaluation. The Code 83 rail height will also help me find those oversize flanges on locomotives and rolling stock for replacement.
  5. 18 gauge wire for track feeds.
  6. Electrical panel for amp voltage meters and DC/DCC easy connect plugs.


Stored configuration


Upright configuration


Electrical

 I haven't gotten the final electrical configuration worked up right now. My plan is to use an old personal computer power supply (See 6.2.5 Power Supplies for additional details) for the 12V DC with a Model Rectifier Corporation Cab Control 77 power controller (I think it was the first 'hand held' throttle advertized) hooked up to the track bus. I will add DC amp and volt meters for analysis.

For DCC I will have a power bus line from the DCC system to the same track bus.

In the meantime I was able to test the test track with an old DC power pack, the Cab Control unit and some jumpers… Around and around the locomotives and rollling stock go during the break-in process!


Sunday, August 8, 2021

Work Spaces

Prototype Information

Class 1's have acres of dedicated work space for constructing, overhauling and repairing locomotives and rolling stock. Lots and lots of room!

One location I had the opportunity to volunteer at was the North Carolina Transportation Museum, the present name for the former Southern Railway Spencer Shops. The Shops were built in the 1890s and named after Southern Railway president Samuel Spencer. Located in Spencer, North Carolina, the Shops were a division point on the Southern Railway's main line between Atlanta GA. and points north and east. It was a main repair repair facility for those lines operating in the Carolinas, Virginia, and Georgia. It had a a 37-stall roundhouse for locomotive repairs, a back shop capable of overhauling 10 to 15 locomotives at one time, a multi-track major car repair in place, and the blacksmith shop, boiler shop, flue shop, woodworking shop, paint shop, master mechanics shop and other shop and warehouse facilities to support those operations. 


The shops ceased working on steam engines in 1953, when the railway company phased them out. Diesel repairs kept the Shops operating until more modern facilities were constructed in Chattanouga. By 1960 only the roundhouse and repair shed were still in use by less than 100 workers. Those activites were ended in 1979 and Spencer Shops was closed. The Southern Railway gifted the state of North Carolina to support the creation of the North Carolina Transportation Museum.

Modeling Information

Even in 1:87th scale I don't have room for a 'prototype' facility. Economy and efficiency is the order of the day. Fortunately I have the internet and a search for railroad modeling work spaces gave me a few leads. Some railroad modelers had work desks, some had pullout work trays, one even had a modeling board and a suitcase of tools and supplies he took with him on trips. A dedicated modeler indeed!

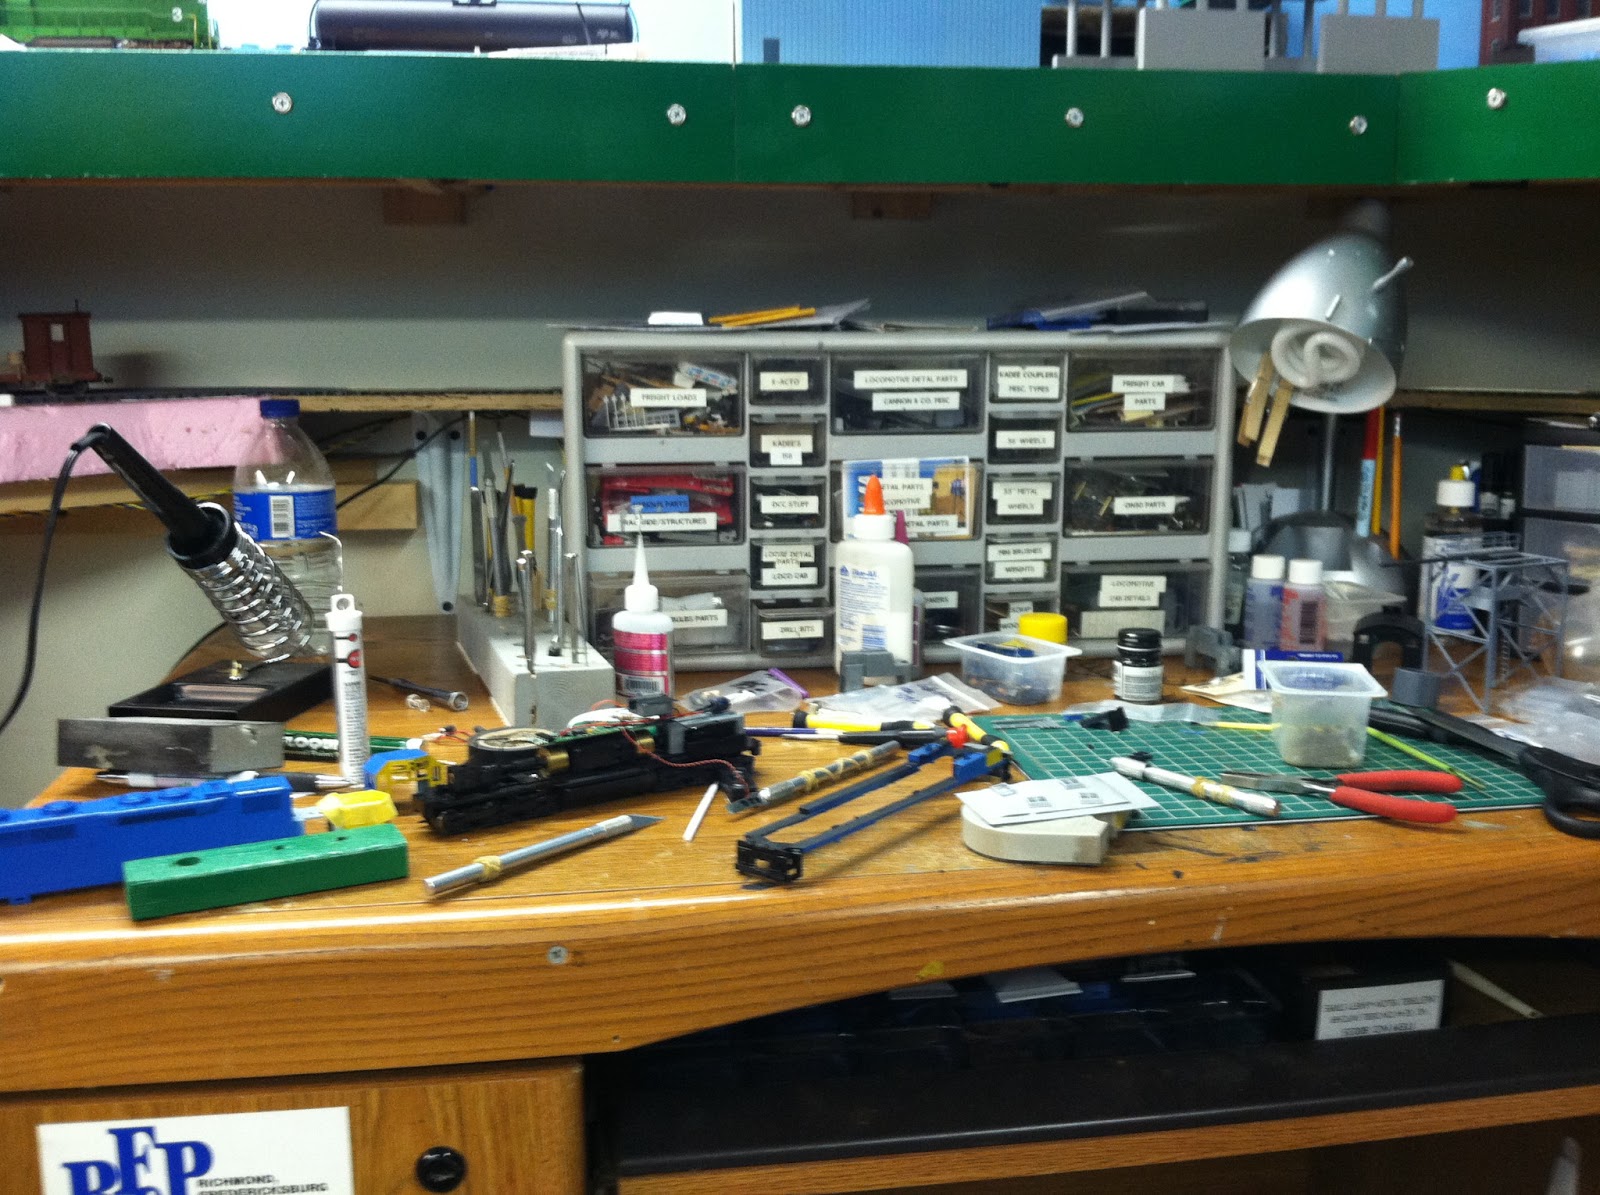
Wherever the railroad modeler does their modeling one thing was very very clear during my search. The modeling area is universally cluttered. I'm grateful for that being the rule rather than the exception. Excepting the clutter, the ingenuity of the modeler is present.

Here are a few of my favorites.

IMG_6554
Stephan Gardiner

Ryan Mendell

_800x719.jpg
Rob McLear 


Neil Ericson

Shannon Crabtree

101_8724.JPG
Kevin Barnett

The WWSL

The WWSL is a moderately sized layout, and now that benchwork construction is done my modeling will now focus on right of way, scenery, locomotives and rolling stock, and structures - most of them either scratchbuilt or kitbatched. So what I need are medium sized workspaces, room for tool and supply storage, a paint booth, and plenty of good light.
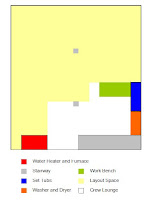
Given and Druthers

1. My work space is going to have to co-located with the utility room and the 'crew lounge'. That means being able to get to the circuit breaker box, and the set tubs (for water and washer drainage). I've got to make room for the washer and dryer. I'm going to want to have space for a dorm room sized refrigerator and coffee pot.

2. I need to have a work bench for small projects. I need space to work on larger projects. I need to have a place to store my layout sized tools. I need a place for storing locomotive and car kits, scratchbuilding and kitbatching parts (large and small). I need a place to store projects that are incomplete. I need a place to store reusable jigs. 

3. I need task oriented lighting.

4. I need vertical space to locate construction checklists, etc.

5. I need self contained construction specific workbench aids to keep the work space generally uncluttered.

6. The work space must be fairly easy to construct and maintain.

Work Bench

The work bench size must be appropriate for the work space I have allocated. The height should match the lower level of the layout for estetic reasons. The depth should be narrower so I can reach the back of the bench when seated. It should have plenty of leg room. I should have a solid top, with a support structure design such that I can clamp stuff to the front of the top as necessary. It should have the ability to clamp reference photos so they are not propped up on the bench surface taking up valuable modelling area.  See 11.1.1 Work Bench for additional details.  
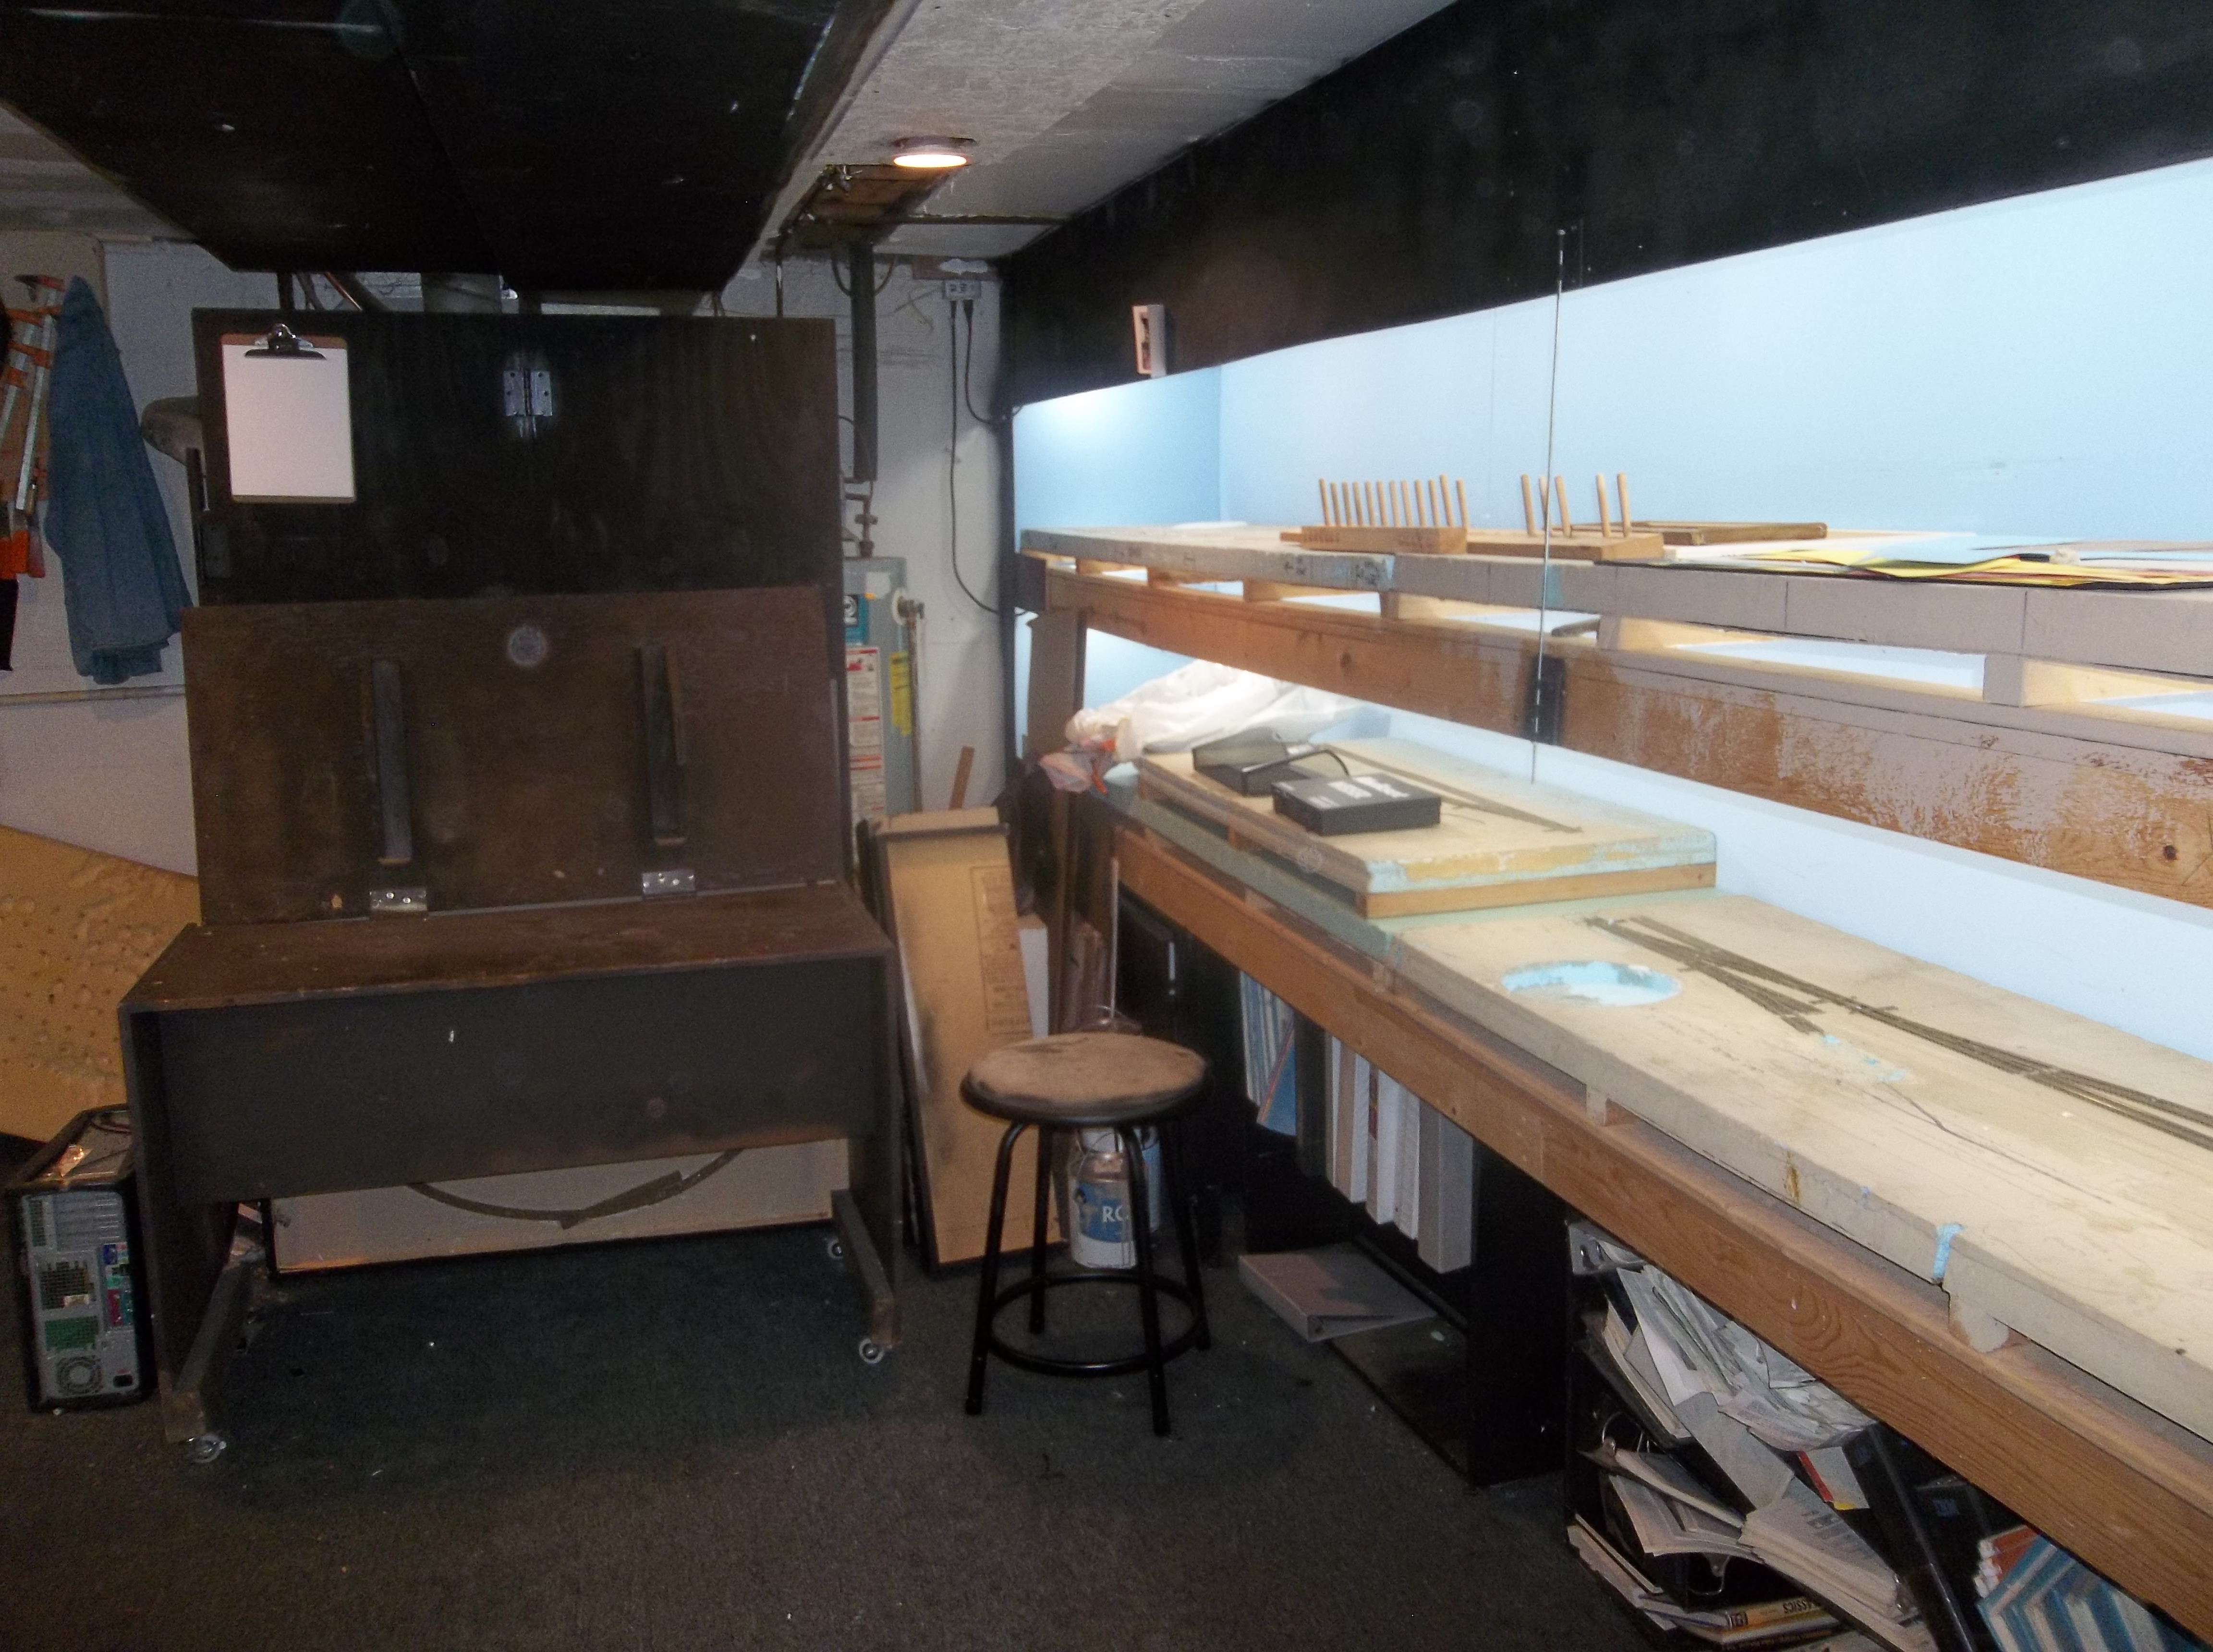
Project Tables

I should have one or more tables available for larger project construction and assembly. Table should be height adjustable if possible. Table top and sides must be such that its easer to clamp tools and jigs for various projects. See 11.1.2 Project Tables for additional details. 

Project Lighting

General lighting and point lighting consistant with the layout lighting. Built in Power Bars on both sides of the bench.

Tool Storage. Tools consolidated based on project requirements. Tool bins appropriate for the project I'm working on. See 11.1.3 Tool Storage for additional details. 

Project Supplies. Supplies consolidated based on use. Cleaning supplies separate from project supplies. Supply bins appropriate for the use, size and quantity of the supplies. An overhead shelf to store small scratchbuilding and kitbatching parts and other miscellaneous stuff. Supply bins clearly labeled and easy to move. 11.1.4 Project Supplies for additional details. 

Project Storage. I know I am going to be working on multiple projects at one time. Those projects awaiting parts or waiting for the next step in the production schedule must be out of harms reach. See 11.1.5 Project Storage for additional details. 

Rolling Caddies. Some activities have to be done at the layout. I need some means of bringing selected tools and supplies to the work location, and keeping those tools and supplies organized. See 11.1.6 Rolling Caddies for additional details. 

Tool Stations. A project always goes faster when I have the right tools and supplies at hand for the job. Some tools are more important than others at any given moment. See 11.1.7 Tool Stations for additional details. 


Sunday, July 11, 2021

Clean up Work

In my last post I committed to getting back in the railroad modeling game. But to do that I have to have space to do the 400 (square foot) of small projects to improve my modeling skills. 

The good thing about having a basement for the railroad is I have space. The bad thing about having a basement is its a great place to store things .... and I stored alot of things.

  • Two rolling caddies of camping gear.
  • Five 2 and 3 shelf bookcases for books and obsolete VHS tapes (alot of tapes!).
  • Several former bedroom dressers reconfigured for draw spaces. 
  • Not one, not two, but three car drawers. See 3.14 Car Drawers for further information.
  • Three cabinets for storing car kits, structure kits, and scenery supplies.
  • Eleven 2 drawer filing cabinets for storing some 50 years of model railroad articles related to every major topic on the reference page sidebar.

Oh ! I forgot to mention the 400 square feet of shelf space that I call the WWSL ver. 3.0.

Lots and lots of stuff. Some organized but it became unorganized as time went on and I wasn't laying track. Other people call that procrastination. I plead guilty (sheepishly).

Well as my friend said ''You can only eat an elephant one bite at a time." So starting at one end, I started the clean up. Lots of clean up. The hardest part was finding the appropriate place to put it. I deliberately didn't take a before picture.

It took a while, and during that time I had to build some storage space that I knew I needed (someday) and that someday arrived. 

Half the layout room is cleaned and organized - the half that I'm going to start working on again. As time goes on, the clutter will continue to be contained, organized or gotten rid of. 


Reload, Coal Grove (top) Wickwood (bottom)


        Satsop River (top)          North River (bottom)


Polson Canyon (top)      Preachers Slough (bottom)

 While I was cleaning I decided to fix some of the stationary furniture in the room. The small table is configured as either the dispatcher's desk, or as a drafting table. It's on wheels now for easy moving as necessary. 

The two cushion couch was demoted from the living room to the crew lounge / utility room. It will be a nice place to sit when the railroading day is done and I'm marveling at my latest small project success. I ran two 2" x 4"s along the bottom and then put wheels on that  so its easy to move from the utility room to the layout space as necessary.


Roller table dispatcher configuration


Roller table draftsman configuration


Crew Lounger


"One bite (project) at a time.' Now I have to work on the workshop area to get it organized.