Sunday, May 31, 2020

Resources 3 - Money

In Layout Design Process 4 - Railroad Modeling I identified that the layout design process can be broken down into three primary functional areas: Concept, Structure and Layout Detail.

Structure. Structure identifies the parameters within which the layout must be designed. It is broken down into two main elements: 3) Resources Available to build the railroad, and 4) Layout Planning.

Under the element Resources Available, the following areas are considered: 3) Money.

Money


We generally don't talk about the cost of a layout. Our first layouts are often based on the toy train set we got as a birthday or christmas present. Plywood and 1xs dont cost much and the cost isn't calculated. As we get older we have three ways to approach budgeting:

  1. Freelance work (pay as we go) on your railroad.
  2. A set budget of what you want to spend for the railroad.
  3. No set budget and willing to pay for what you want.

Material and component selection. 


I believe that we all have at one time or another build a layout based on our financial capability at the moment. Early layouts no dobut featured sub-par materials and locomotives and rolling stock brands that looked great but ran poorly. As our financial capbility improved (and the model railroad industry improved quality) our follow-on layouts were upgraded and improved upon. A layout featuring high quality track, components, and rolling stock is a pure joy to run.

Friends over the years have asked me how much my layout cost. Frankly I hadnt kept up with the costs, 1) because it was a hobby, and 2) some stuff i bought retail, some I bought at train shows at discount, some was donated, and all of it was obtained over years in the hobby. I still have my original train set i got as a gift from my father .... its been recycled over the numerous layouts I have constructed over time.

For those who are entering the hobby for the first time, there is a cost. Model Railroader magazine has for years published entry level model railroad plans. The last entry level plan I read about was a 4x8 foot layout with DC toy train locomotive and rolling stock and basic sectional track and turnouts and a modest number of structures. The publishers indicated the price at approximately $500.00.

Custom model builders are out there willing to design and build a model railroad layout for those who dont want the thrill of benchwork construction, tracklaying, electrical wiring and scenery and structure building. One builder ranks his services as B level (basic benchwork, roadbed and track) or . Prices start at about $70 - $95 per square foot for a B Level HO or O scale layout. This would include . N scale layouts are about 50%--75% higher on a square foot basis. A or AA level quality will add 15% and 35% respectively.

The basic scenery portion of a layout (rolling hills or flat areas with grasses, dirt and gravel coverage) will add from $25 - $50 per square foot over the base price depending upon the amount of contouring. Extensive rock outcroppings or cliffs/canyons will be $55 - $100 per square foot or more additional depending on the extent of vertical coverage and level of detailing. Streams, rivers and lakes will add $35 - $90 per square foot over the base price depending upon the level of detail. Urban areas with their high concentration of structures, roads, streets, figures and details will add $55 - $120 or more per square foot to the base price depending upon the structure types and density.

As you can see, the custom costs can be astronomical. If you're doing it yourself (DIY), you will not be paying the hourly rate for the custom builder's time and effort. Those who DIY often estimate their efforts at $60 - 100 per square foot depending on the size and quality/quantity of their layout and equipment. 

WWSL costs 

 
As I have indicated earlier, the WWSL is version 3, and I have recycled alot of the benchwork, modules, trackwork, locomotives and rolling stock over the years. For this blog, I have gone back and calculated the costs of room preparation, benchwork, right of way, trackwork, locomotives and rolling stock assuming 2020 prices. Fortunately 20 years of model railroading brings with it lower entry costs and long term savings, so the pricing you see below is NOT what I've paid so far. It does however give you an indicator of current costs (or replacement costs for insurance purposes).


Room Preparation


Benchwork


Module


Trackwork


Locomotives and Rolling Stock


Wednesday, May 27, 2020

Valence 2

An interesting thing happened on the way to completing the valence on the peninsula.

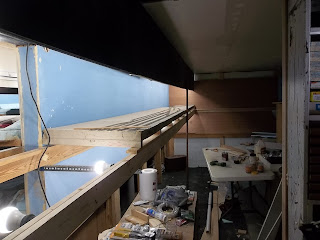
The end valence is the same height as all the others. This is what you see looking lengthwise through the peninsula with the end valence in place.


This is what you see looking at the peninsula from the side aisle. I expected that the standard height valence to cover the light bar all the way down the peninsula. It doesnt.


 The end of the peninsula is an open 4 foot by 5 foot area. This new viewing depth shows all the lightbulbs and wiring. Not quite what I expected to see. From the observer's position the entire light strand is visible and very very annoying visually.


This requires two additional valences:
  1.  A 4 inch height valence added to the bottom of the end valence. This hides the 20 feet of light bar.
  2. A 8 inch valence attached parallel to the center beam. the question then became: Do i paint the valence black or sky blue? 
More next week as I consider solutions to this dilemna. 


Sunday, May 24, 2020

Resources 2 - Skills / Experience

In Layout Design Process 4 - Railroad Modeling I identified that the layout design process can be broken down into three primary functional areas: Concept, Structure and Layout Detail.

Structure identifies the parameters within which the layout must be designed. It is broken down into two main elements: 3) resources available to build the railroad, and 4) layout planning.

Under the element Resources Available, the following areas are considered: 2) Skills/Experience.

Lance M in his blog lancemindheim.com. discusses the skills and experience factors in layout design and construction. His bottom line observation is:'If you haven’t built a complex layout before maybe you do a flatter, simpler one first.

Experience


Let's talk Experience first. Have you built any layouts before?

The modeling press has identified that a model railroader typically enter the hobby at two points in their lives, either during the teen years or at retirement. Those coming into model railroading later in the life do so with many more resources than their teen counterparts. On the surface that can seem like a good thing but, more often than not, it can be a case of the proverbial “having enough rope to hang yourself”. The sixty or seventy something retiree often has ample space and funds to commit to grandiose plans that he has yet to acquire the skills to execute. The teen has neither ample space or funds, nor has the skills to execute.

Lance suggests that the entry level modeler should warm up to the hobby by building smaller practice layouts first. Model Railroader magazine has always catered its articles on the beginner in the hobby. They recognize that early success and momentum is crucial when it comes to building passion for the hobby. On the flip side, hard to build elements can create construction quagmires that bog a persondown as they face one construction challenge after another. The key to success is to keep the first effort simple, something that falls together easily. The acronym KISS - Keep It Simple Stupid - is one of two signs currently occupying my layout room. (The other sign is - Think like a Short Line.)

As i indicated in my blog Layout Desig Process - Train Set, there are a number of layout design planning magazines and books out there that have beginner layouts already designed. I will admit that there were a couple of oval, figure -eight, and 'spaghetti-like' layout plans in my early years. I will also admit that they were short duration layouts - a train going round and round and round just got boring pretty quick and I 'graduated' to shelf layouts with less round and round and more industrial switching activities.

Lance has designed and built 4 small layouts that certainly are a cut above the layout designs of the 70-s and 80's . You can find them here. Lance's suggestion for a beginner layout would be: two inch extruded foam sub-roadbed base, Atlas code 83 flex track for the straights, Atlas 24 inch sectional track for the curves, and Atlas number six turnouts. I didn't have extruded foam available i my youth - plywood and homosote was subroadbed and roadbed standards at the time - but it makes sense today. 

It was an article in the 1995 Model Railroader by David Barrow that caught my eye and set me on the modular course that I have continued to use to this day, and it certainly supports Lance's thoughts of beginner layouts. He developed layout benchwork that was minimalist in nature, easily constructed (and deconstructed) and practical for the growth of the modeler as he obtained skills and experience.In articles written over the years he advocated recycling of materials, tacking down rather than gluing down track and turnouts, not using ballast at all, no scenery, etc. Not unlike model railroads constructed in the 40's 50's and 60's.

Skills 

 My dad once told me that model railroading was like the skill trades - first you are an apprentice, then a journeyman and then if you choose to progress - a master in the field. And he was right. Model Railroading is a hobby that offers alot of modeling opportunities for all levels of expertise. Benchwork starts with a saw, a drill, a screwdriver and a level, progresses to Lgirder and then open frame. Trackwork starts with a compass, a ruler, tack hammer or glue dispenser putting down sectional track and turnouts, followed by flex track and improved performance turnouts to handlaid track and turnouts. Locomotives start with ready to run (RTR) models to kitbatching and then scratchbuilding Scenery starts with a flat surface painted with browns or greens and progresses to wire or cardboard mesh and plaster, and ends with plaster rock castings, sculptimld and static grass and hand made trees in a variety of techniques. As a modeler you choose the level of interest you wish to pursue.

In LTG #4: I said i wanted to improve my modeling skill sets in the areas of scenery, electrical, locomotive and rolling stock kitbatching, and structure building. I'm a journeyman in the benchwork trackwork and electrical aspects of the hobby and an apprentice in everything else. I'm going to use the National Model Railroad Association Model Railroading Achievement program to advance my apprentice skills and hone my journeyman skills to the master level. I look forward to kitbatching and scratchbuilding prototype locomotives, rolling stock and structures appropriate to my railroad modeling Scenery-wise im not as accuracy focused - grass is grass, hills are hills, trees are trees, and if i can generally model a scene so it looks similar to the prototype photo I have of my area of interest i will be happy.

If youre a beginner, the Golden Spike Award is a good start. I will use the NMRA Achievement Program as a guide to my skill progression. Perhaps I'll make it to Master Model Railroader - you never can tell !

Wednesday, May 20, 2020

Benchwork 7

The valence along the center peninsula was built and installed. The party light string was continued from valence level in Zone 2 around the end of the peninsula and down to the end wall.

The upper benchwork frame was constructed and installed. The light string was continued from zone 2 around the end of the peninsula and down to the end wall.


I then built the peninsula end valence. An interesting measure twice, cut once exercise that I'll discuss next week in greater detail.


The lower benchwork frame was constructed and installed. I then moved the 4 modules from storage onto the benchwork.


The good news is that this construction frenzy completes the rebuilding of the existing version 2 layout footprint and completes STG #1:  I wanted the first half of the layout room constructed, utilizing the existing WWSL 2.0 bench work installed within 3 to 6 months.


Sunday, May 17, 2020

Resources 1 - Time / Energy / Commitment

In Layout Design Process 4 - Railroad Modeling I identified that the layout design process can be broken down into three primary functional areas: Concept, Structure and Layout Detail.

Structure. Structure identifies the parameters within which the layout must be designed. It is broken down into two main elements: 3) resources available, and 4) layout planning to build the railroad. At the ed of the structure phase you should have identified the scale and size of your layout and a series of 'given and druthers' you wish to achieve in the track planning process. 

Under the element Resources Available, the following areas are considered:

  1. Time / Energy / Commitment
  2. Skills/Experience
  3. Money
  4. Space

Time / Energy / Commitment


Lance Mindheim, in his layout design blog, https://www.shelflayouts.com suggests that rather than let available space drive the planning process, the modeler should let available time drive the design. Lance believes that having time for layout construction may be the biggest factor when youre deciding how large a layout to tackle. Those with limited time due to pressing job responsibilities and competing interests will likely find that trying to build a several hundred square foot layout is ill advised.  Lance posits two specific questions:

    1) How much time does the modeler have to work on the layout?

    2) How long will the modeler have the layout?

In The Railroad Model Journey (http://modelingthewwsl.blogspot.com/2019/12/the-railroad-modeling-journey.html) I stated that I had a number of model railroad layouts in various sizes and degrees of completeness over the years. Some were incomplete by design, others went incomplete due to fatherhood and job responsibilities.

Rarely in the model railroad press is there mention of the time it takes to construct a model railroad. In the Model Railroad Planning 2004, Paul Dolkos wrote an article "How big should your layout be?" He discusses time, scope, availability of skilled help, money and maintenance. Paul introduces an 18' x 21- foot layout that Mat Thompson was constructing. Mat estimated that it would take 3400 hours to complete the layout. Those hours were based on: 

  • Benchwork  - 300 square feet -  100 hours
  • Track  -  600 feet  - 1 hour/foot - 600 hours 
  • Turnouts -  50 turnouts and switch machines - 3  hours/turnout - 150 hours
  • Scenery -  300 square feet  - 2 hours/square feet -  600 hours
  • Structures - 10 large building - 100 hrs each - 15 medium buildings 50 hrs each - 15 small buildings 20 hours each - 2,050 hours
  •  
Imagine the estimated hours for another layout Paul Dolkos highlights - J.D.Smith's Southern Rwy Rats Hole Division - 1900 feet of track, 203 turnouts. Using the Thompson baseline, J.D. Smith's estimate would be ~5400 hours absent scenery and structures.

The WWSL


Now that my family is grown up and on their own, and I'm semi-retired, its time to commit to  to railroad modeling. No more PTA, scouts, car pooling, overtime at the office, and the myriad of commitments that comes with family. I will have the time to build out the layout. For my last layout I'm assuming it will have a lifespan of 8-10 years. That number isn’t something I pulled out of thin air. I'm 64 right now. Based on a variety of factors, I anticipate 8-10 years of productive retirement life. Im in my retirement location.  I anticipate the heavy lifting of layout construction (things like the benchwork, track, wiring) will be completed in 2 years.Everything else is 'gravy'!

I've estimated that i have about an hour a day and 6 hours a weekend for layout construction. I’ve found that plugging away on the layout a little bit every day is a good way to make fast progress. On weekends I’m able to get 2-3 hours done at one stretch, but during the week even half an hour before I head for bed speeds things along.

As I have already planned and constructed parts of the WWSL in previous configurations, I know that I have approximately 400 square feet of benchwork (150 hours),  200 feet of track (200 hours), and about 50 turnouts (100 hours), scenery (400 hours) for a total estimate of 850 hours less structures.

If you recall in my Long Range Goal's -  LTG #5: I want the layout to be completed to general standards within 3 years, and enjoyable for a total of 8 to 10 years. I want the layout to be affordable, utilizing my existing modules, locomotives and rolling stock whenever possible. I have a number of modules and backdrops already constructed and in storage. If you have been following my construction pages you will see that I have completed approximately 75 percent of the benchwork through judicious recycling and new construction and materials as needed.


Wednesday, May 13, 2020

Room Preparation 6

Room preparation continues in zone 3 .I had a couple days off and went into a construction frenzy.

I went out and rented a drywall lift because the ceiling on this side of the basement is unemcombered with heating and cooling ducts and water and gas lines. 

While it took a bit of time to clear out the stuff cluttering the floor, the drywall went up easily and my back is certainly thanking me for renting this labor saving device. 


The ceiling was spackled along the center peninsula to a depth of three feet into the room. After sanding that part of the ceiling was painted.

The return air duct was insulated and painted black.

Another two rolls of carpeting went down on the floor and was aligned and taped to the two rolls in Zone 2 and 4. 

Sunday, May 10, 2020

Structure - Overview

In Layout Design Process 4 - Railroad Modeling I identified that the layout design process can be broken down into three primary functional areas: Concept, Structure and Layout Detail.

Structure. Structure identifies the parameters within which the layout must be designed. It is broken down into two main elements: 3) resources available, and 4) layout planning to build the railroad. At the end of the structure phase you should have identified the scale and size of your layout and a series of 'given and druthers' you wish to achieve in the track planning process. 

Under the element Resources Available, the following areas are considered:

  1. Time / Energy / Commitment
  2. Skills/Experience
  3. Money
  4. Space

 Under the element Layout Planning, the following areas are considered:

  1. Space - the amount of space you have to dedicate to your layout.
  2. Scale - the physical size of the locomotives, rolling stock and structures youre going to model.
  3. Operating Style -how the owner/operator wants to interact with the layout.
  4. Shape - the shape of the layout.
  5. People Oriented Parameters - specifications to be followed in the design of the layout.
  6. Layout Oriented Parameters - specifications established through the layout concept process that will be used in the design of the layout.
  7. Scenery - the type of scenery (including the absence of such) that will be incorporated in the layout.
  8. Control - the electro-mechanical control of the locomotives, the turnouts and other facets of railaroad control as part of operating the layout.

Wednesday, May 6, 2020

Under Layout Storage

The lower deck of the layout is 34 inches above the floor. This allows a footprint of 120 square feet of storage space under the layout.

Planned storage includes three interchange drawer units, a tool caddy, two roller cabinets for camping gear, 5 bookcases, three storage cabinets and ten two-drawer filing cabinets. All will be painted black to minimize normal viewing.

Those storage cabinets located under the layout in Zones 2 and 4 were assembled, painted and installed under the layout.


With storage cabinets in place the basement is quickly becoming uncluttered and easier to work in.

Sunday, May 3, 2020

Layout Concept - Defining and Redefining


In Layout Design Process 6 - Defining and Redefining I identified a problem solving process of defining and redefining the objective at hand, in this case moving from a broad idea to fine tuning the process (in this case layout design) to those final elements that can be reasonably represented on the layout.

I had a pretty good idea what I wanted - geographically, type and size, and industries. That lead to my early development of the 5 second ‘overview' of my layout that you see on the banner of this blog:


..... the Western Washington Short Line, a HO multi-deck layout freelance - prototype railroad model in the 1950s based on my interests in Class III railroads, traction, logging and coal mining ...


With that in mind, I was able to investigate prototype railroads in the geographic area and identify areas of specific modeling interests. Those interests then were documented in a 'theme' document I could then refer to in the track planning process. You can find that theme document here.

For those who approach the concepual process differently, there is another tool that can be used to assist in the definition and redefinition process.

Bernard Kempinski has documented his layout concept process within a spreadsheet format. You can find his process here. A copy of his spreadsheet shows his givens and druthers.


Notice that Bernard identifies his givens and druthers in a series of rows, and then has a number of options to meet each given and druther in a number of columns. Bernard then weights each given and druther with each option. The 'best' option based on weighted averages would then recommend that option to the modeler.


Alternatively, if a modeler had no set prototype interests, then his research could be based on modeling interests (by row) and he would identify specific railroads that had operations that supported those modeling interests identified in a specific column. Weighting each category would then give the modeler a recommendation of which railroad (or branch, or subdivision, etc) to model.

Here's what Benard did back in 2006 when he was modeling a differrent layout. You can find the entire article in Model Railroad Planning 2006.


Here is my specific railroad interest and modeling interests 'druthers' based on the information I gathered during the Concept phase of the layout design. These druthers will be consolidated with those developed during the structural component to determine my final layout design.


You will find the WWSL's design matrix here.


References: