A discussion of layout benchwork is found at 3.4 Benchwork. As discussed benchwork can be free-standing or it can be connected to the layout room walls. This construction page discusses several ways of attaching the benchwork to the wall.
Modeler Information
For most modelers, the existing wall structure in their layout room is probably a wood stud wall, sheathed with drywall. Layout benchwork can be secured directly to the wall (preferably at the vertical stud location) with lag screws or drywall / deck screws, or mounted on shelf brackets.
 |
| Furlow Stud Wall |
Malcolm used 2"x2" lumber with a T-nut and carriage bolt on one end and a small piece of thin plywood on the other. The entire assembly was cut to the height of the wall less an inch or so. The plywood plate protected the drywall ceiling, the T-nut provided the tension that locked the 2"x2" between the floor and ceiling. In tension, the assembly allowed a temporary but sturdy foundation for brackets, girders, or other benchwork solutions.
The WWSL
The WWSL
Version 2.0 was located in a finished garage. I used L-Girder
construction. Horizontal L-Girders were screwed into the walls at the
stud location.
I could have nailed the L-Girders into the concrete. I hate nailing or drilling into concrete. Its hard, messy and in the case of a basement wall, can cause cracks in the wall potentially allowing water infiltration. Not a good thing.
I ran across Malcom's system in my files and found my solution. I modified his system for the WWSL Version 3.0.
 | |
| WWSL stud wall - corner and 8' section |
2. I used 2"x4" and 2"x 6" in lieu of Malcom's 2"x2". This provided greater vertical strength for supporting a two deck layout and a larger surface area for installing the backdrop and L-Girders.
3. Malcom did not specifically address corners. For corners I made an compression L-Girder stud from a 2"x4" and 2"x6" screwed in on edge. This made a solid corner unit for securing the backdrop and benchwork.
At the first 4 foot horizontal interval I used a 2"x4" compression stud, centered at the 4 foot mark. I attached the stud to the top 2"x2" with a straight or T-shaped mending plate. I then leveled the stud vertically and adjusted the T-nut at the bottom of the stud to the correct tension.At the eight foot mark i installed a 2"x 6" compression stud using the same method. This then allowed me to use an eight foot long L Girder made from 1"x3" and 1"x4" lumber for horizontal members.
Construction of the stud wall
was repeated for each additional eight foot length, a 4 inch stud
followed by a 6 inch stud. The final partial length (< 8 feet) was
cut to size, eliminating the 4 foot stud if practical.
Plan B.
I quickly learned that using mending plates and T-nuts wouldnt adequately secure the compression studs to the new top plate. Plan B used aluminum rafter plates to secure the vertical stud to the horizontal 2"x2" along the ceiling.
The T-nuts were a pain to adjust. Cresent wrenches took forever. I found a superior
alternative to the T-nut at Lee's Valley and retrofitted the feet.
 |
| Improved Foot |
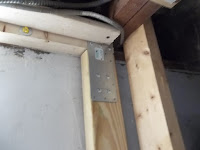 |
| Aluminum rafter plate |
Construction Review.
Here is a photo recap of the construction process.
|
|
|
|


|
L-Girder Installed (missing photo) |
|
|


No comments:
Post a Comment